NEBNext® Fast DNA Library Prep Set for Ion Torrent™
Overview
Symbols
 |
This is a point where you can safely stop the protocol and store the samples prior to proceeding to the next step in the protocol. |
 |
This caution sign signifies a step in the protocol that has two paths leading to the same end point but is dependent on a user variable, like the type of RNA input. |
 |
Colored bullets indicate the cap color of the reagent to be added |
Starting Material: 10 ng–1 μg of Fragmented DNA.
Note: For use with the Ion Xpress™ Barcode Adapters 1-16 Kit, a minimum of 100 ng starting material is recommended. Lower amounts may cause adaptor concatamerization.
1. End Prepare of DNA
1.1. Mix the following components in a sterile microfuge tube on ice:
Fragmented DNA 1–51 μl
NEBNext End Repair Reaction Buffer 6 μl
NEBNext End Repair Enzyme Mix 3 μl
Sterile H2O variable
-------------------------------------------------------------------------
Total volume 60 μl
1.2. Incubate in a thermal cycler for 20 minutes at 25°C, followed by 10 minutes at 70°C, hold at 4°C.
1.3. Pulse spin the microfuge tube and return to ice.
2. Preparation of Adaptor Ligated DNA
2.1. Add the following to the microfuge tube:
| Component | For 10 ng | For 100 ng – 1 µg |
| Sterile H2O | 18 µl | 3 µl |
| T4 DNA Ligase Buffer for Ion Torrent | 10 µl | 10 µl |
| Bst 2.0 WarmStart DNA Polymerase | 1 µl | 1 µl |
| NEBNext DNA Library Adaptors for Ion Torrent | 5 µl | 20 µl |
| T4 DNA Ligase | 6 µl | 6 µl |
| Total volume | 40 µl | 40 µl |
2.2. The total volume in the microfuge tube should be 100 µl. Mix the contents by pipetting up and down several times.
2.3. Incubate in a thermal cycler for 15 minutes at 25°C, followed by 5 minutes at 65°C, hold at 4°C.

If performing size selection with beads, proceed directly to size selection
using AMPure XP Beads. If using E-gel or agarose gel for size selection,
proceed to Cleanup of Adaptor Ligated DNA before proceeding to gel-based size selection.
3. Size Selection Using AMPure XP Beads
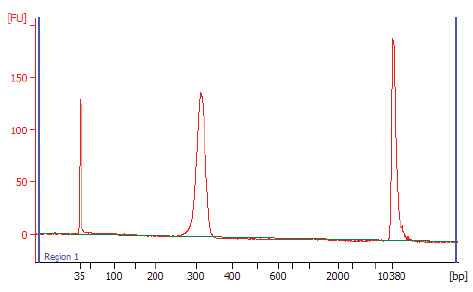
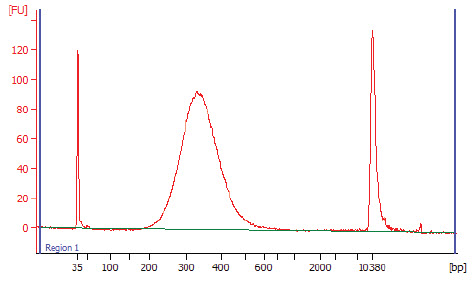
For AMPure XP Bead-based Size Selection, expect size distributions in the range of 230–270 for 100 bp reads and 310–370 for 200 bp reads.
Table 1: Recommended Conditions for Dual Bead-based Size Selection
| BEAD:DNA RATIO* | INSERT SIZE (bp) | |
| 100 bp | 200 bp | |
| 1st Bead Selection | 0.9X | 0.7X |
| 2nd Bead Selection | 0.15X | 0.15X |
*Bead:DNA ratio is calculated based on the original volume of DNA solution.
AMPure XP Bead-based Dual Bead Size Selection for 100 bp Inserts
The following size selection protocol is for libraries with 100 bp insert from a 100 μl volume. For libraries with a 200 bp insert please use the bead:DNA ratio listed in the chart above
1st Bead Selection to Remove Large Fragments:
This step is used to bind the large, unwanted fragments to the beads. The supernatant will contain the desired fragments.
3.1. Add 90 µl (0.9X) resuspended AMPure XP beads to 100 µl DNA solution. Mix well on a vortex mixer or by pipetting up and down at least 10 times.
3.2. Incubate for 5 minutes at room temperature.
3.3. Place the tube on a magnetic rack to separate the beads from the supernatant. After the solution is clear (about 5 minutes), carefully transfer the supernatant to a new tube (Caution: do not discard the supernatant) Discard beads that contain the large fragments.
2nd Bead Selection to Remove Small Fragments and to Bind DNA Target:
This step will bind the desired fragment sizes (contained in the supernatant
from Step 3) to the beads. Unwanted smaller fragment sizes will not bind to the
beads.
3.4. Add 15 µl (0.15X) resuspended AMPure XP beads to the supernatant, mix well and incubate for 5 minutes at room temperature.
3.5. Put the tube on a magnetic rack to separate beads from supernatant. After the solution is clear (approximately 3 minutes), carefully remove and discard the supernatant. Be careful not to disturb the beads that contain DNA targets (Caution: do not discard beads).
3.6. Add 200 µl of 80% freshly prepared ethanol to the tube while in the magnetic stand. Incubate at room temperature for 30 seconds, and then carefully remove and discard the supernatant.
3.7. Repeat step 3.6 once for a total of two washes. Be sure to remove all visible liquid after the second wash. If necessary, briefly spin the tube/plate, place back on the magnet and remove traces of ethanol with a p10 pipette tip.
3.8. Keeping the tube on the magnetic rack, with the cap open, air dry the beads for 5 minutes.
Caution: Do not over-dry the beads. This may result in lower recovery of DNA target. Elute the samples when the beads are still dark brown and glossy looking, but when all visible liquid has evaporated. When the beads turn lighter brown and start to crack, they are too dry.
3.9. Remove the tube from the magnet. Elute DNA target from beads into 42 μ l sterile 0.1X TE. Mix well on a vortex mixer or by pipetting up and down, incubate for 2 minutes at room temperature.
3.10. Put the tube in a magnetic rack until the solution is clear, approximately 3 minutes. Transfer approximately 40 μl of the supernatant to a clean tube.
3.11. Proceed to PCR Amplication in Section 5.
4. Cleanup of Adaptor Ligated DNA
4.1. Add 180 µl (1.8X volume) of AMPure XP Beads to the sample and mix by pipetting up and down.
4.2. Incubate for 5 minutes at room temperature.
4.3. Pulse spin the tube and place in a magnetic rack for approximately 2–3 minutes until the beads have collected to the side of the tube and the solution is clear.
4.4. Carefully remove and discard the supernatant without disturbing the beads.
4.5. Keep the tube on the magnet and add 200 µl freshly prepared 80% ethanol. Incubate at room temperature, for 30 seconds, and carefully remove and discard the supernatant.
4.6. Repeat step 4.5 once for a total of two washes. Be sure to remove all visible liquid after the second wash. If necessary, briefly spin the tube/plate, place back on the magnet and remove traces of ethanol with a p10 pipette tip.
4.7. Keeping the tube in the magnetic rack, with the cap open, air dry the beads for up to 5 minutes at room temperature.
Caution: Do not over-dry the beads. This may result in lower recovery of DNA target. Elute the samples when the beads are still dark brown and glossy looking, but when all visible liquid has evaporated. When the beads turn lighter brown and start to crack, they are too dry.
4.8. Remove the tube from the magnet. Resuspend the beads in 25 μl of sterile 0.1X TE (volume may be adjusted for specific gel-based size selection protocol). Incubate for 2 minutes at room temperature.
4.9. Pulse-spin the tube and return to the magnet, until the beads have collected to the side of the tube and the solution is clear.
4.10. Transfer approximately 20 μl (or desired volume) of the supernatant to a clean tube, being careful not to transfer any beads.
5. PCR Amplification of Adaptor Ligated DNA

A precipitate can form upon thawing of the NEBNext Hot Start HiFi PCR Master Mix. To ensure optimal performance, place the master mix at room temperature while performing size selection/cleanup of adaptorligated DNA. Once thawed, gently mix by inverting the tube several times.
1.Mix the following components in a sterile microfuge tube:
For 10 ng – 100 ng
Adaptor Ligated DNA 1-40 μl
Primers 4 μl
Sterile H2O variable
NEBNext Q5 Hot Start HiFi PCR Master Mix 50 μl
--------------------------------------------------------------
Total volume 100 μl
For 1 µg
Adaptor Ligated DNA 1-40 μl
Primers 10 μl
Sterile H2O variable
NEBNext Q5 Hot Start HiFi PCR Master Mix 50 μl
--------------------------------------------------------------
Total volume 100 μl
PCR cycling conditions
| STEP | TEMP | TIME |
|---|---|---|
| Initial Denaturation | 98°C | 30 seconds |
| 4–12 Cycles | 98°C | 10 seconds |
| 58°C | 30 seconds | |
| 65°C | 30 seconds | |
| 1 Cycle | 65°C | 5 minutes |
| Hold | 4°C | ∞ |
Cycling Suggestions:
| DNA | CYCLES |
| 10 ng | 10–12 |
| 100 ng | 6–8 |
| 1 μg | 4–6 |
6. Cleanup of Amplified Library
6.1. Add 90 µl (0.9X volume) of AMPure XP Reagent to the sample and mix by pipetting up and down.
6.2. Incubate for 5 minutes at room temperature.
6.3. Pulse-spin the tube and place in a magnetic rack for approximately 3 minutes until the beads have collected to the wall of the tube and the solution is clear.
6.4. Carefully remove and discard the supernatant without disturbing the beads.
6.5. Keep the tube on the magnet and add 200 µl freshly prepared 80% ethanol. Incubate 30 seconds, and carefully remove and discard the supernatant.
6.6. Repeat step 6.5 once for a total of two washes. Be sure to remove all visible liquid after the second wash. If necessary, briefly spin the tube/plate, place back on the magnet and remove traces of ethanol with a p10 pipette tip.
6.7. Keeping the tube in the magnetic rack, with the cap open, air dry the beads for up to 5 minutes at room temperature.
Caution: Do not over-dry the beads. This may result in lower recovery of DNA target. Elute the samples when the beads are still dark brown and glossy looking, but when all visible liquid has evaporated. When the beads turn lighter brown and start to crack, they are too dry.
6.8. Remove the tube from the magnet. Resuspend the beads in 35 μl of 0.1X TE and incubate for 2 minutes at room temperature.
6.9. Pulse-spin the tube, return to the magnet until the beads have collected to the wall of the tube and solution is clear.
6.10. Transfer approximately 30 µl of supernatant to a fresh tube. Be careful not to transfer any beads.
6.11. Dilute 2-3 μl of the library 1:4 in 0.1X TE. Assess the library quality on a Bioanalyzer.

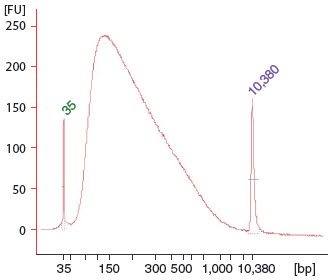
1 μg of E. coli DNA was fragmented and end repaired for 20 minutes at 25°C, followed by 10 minutes at 70°C.


